Managing Frontend Layer of website with User.com

Dynamic website personalization with User.com
The User.com application allows you to dynamically customize website elements based on visitor data. This personalization can be driven by data assigned to a user's profile (like attributes and events found in the Data -> People section) or by their real-time actions on your site, such as visiting a specific URL.
Key advantages of on-site personalization
Using User.com's automation modules ("HTML block" and "Send code") to manage on-site content provides several powerful benefits, regardless of which module you choose:
Time-Bound Campaigns without Code Changes: Easily manage time-sensitive content like promotions. You can define the exact time frame for a scenario to be active directly within the User.com automation, eliminating the need for developer intervention on your website.
Rich, Multi-Channel Personalization: Display highly relevant content based on a complete view of the user. You can leverage all data collected in User.com—including attributes, events, and information from multiple channels (email, chat, etc.).
Personalization with Snippet Tags: Both modules support Snippet Tags (e.g.,
) to insert dynamic user data directly into your HTML or JavaScript, making the content highly personalized. Learn more about Snippet Tags.
Choosing your module: HTML block vs. Send code
While both modules are triggered by automations, they are designed for different levels of complexity.
The "HTML block" module: For simple content swaps
This is the simplest method for direct content manipulation. It allows you to insert or replace a piece of code within a <div> element that has a specific class. It's best for straightforward content swaps. Learn more about the "HTML block" module.
Advantages:
Simplicity: It's easy to define the HTML content that will replace the existing code.
Built-in Analytics: Comes with ready-made statistics for tracking views and clicks.
Limitations:
Element Specificity: It only works on
<div>elements and targets them via a class.Global Application: When activated, it affects all
<div>elements with the specified class on the page.
The "Send code" module: For advanced & custom logic
This is a much more flexible and powerful module that allows you to execute any custom JavaScript on your website. It can be used in two primary ways: to directly manipulate content from User.com, or to send data to your website and let your own code handle the changes.
Use Case 1: Direct content manipulation
In this scenario, the JavaScript you send directly finds and modifies elements on the page. This is great for bypassing the limitations of the "HTML block" module.
Advantages:
Ultimate Flexibility: Can target any element on your page using any CSS selector.
Full Control: Allows for complex logic and manipulations using the full power of JavaScript.
Limitations:
Increased Complexity: Requires knowledge of JavaScript to create the content and logic.
Manual Analytics: You must implement your own tracking for views and clicks within your script.
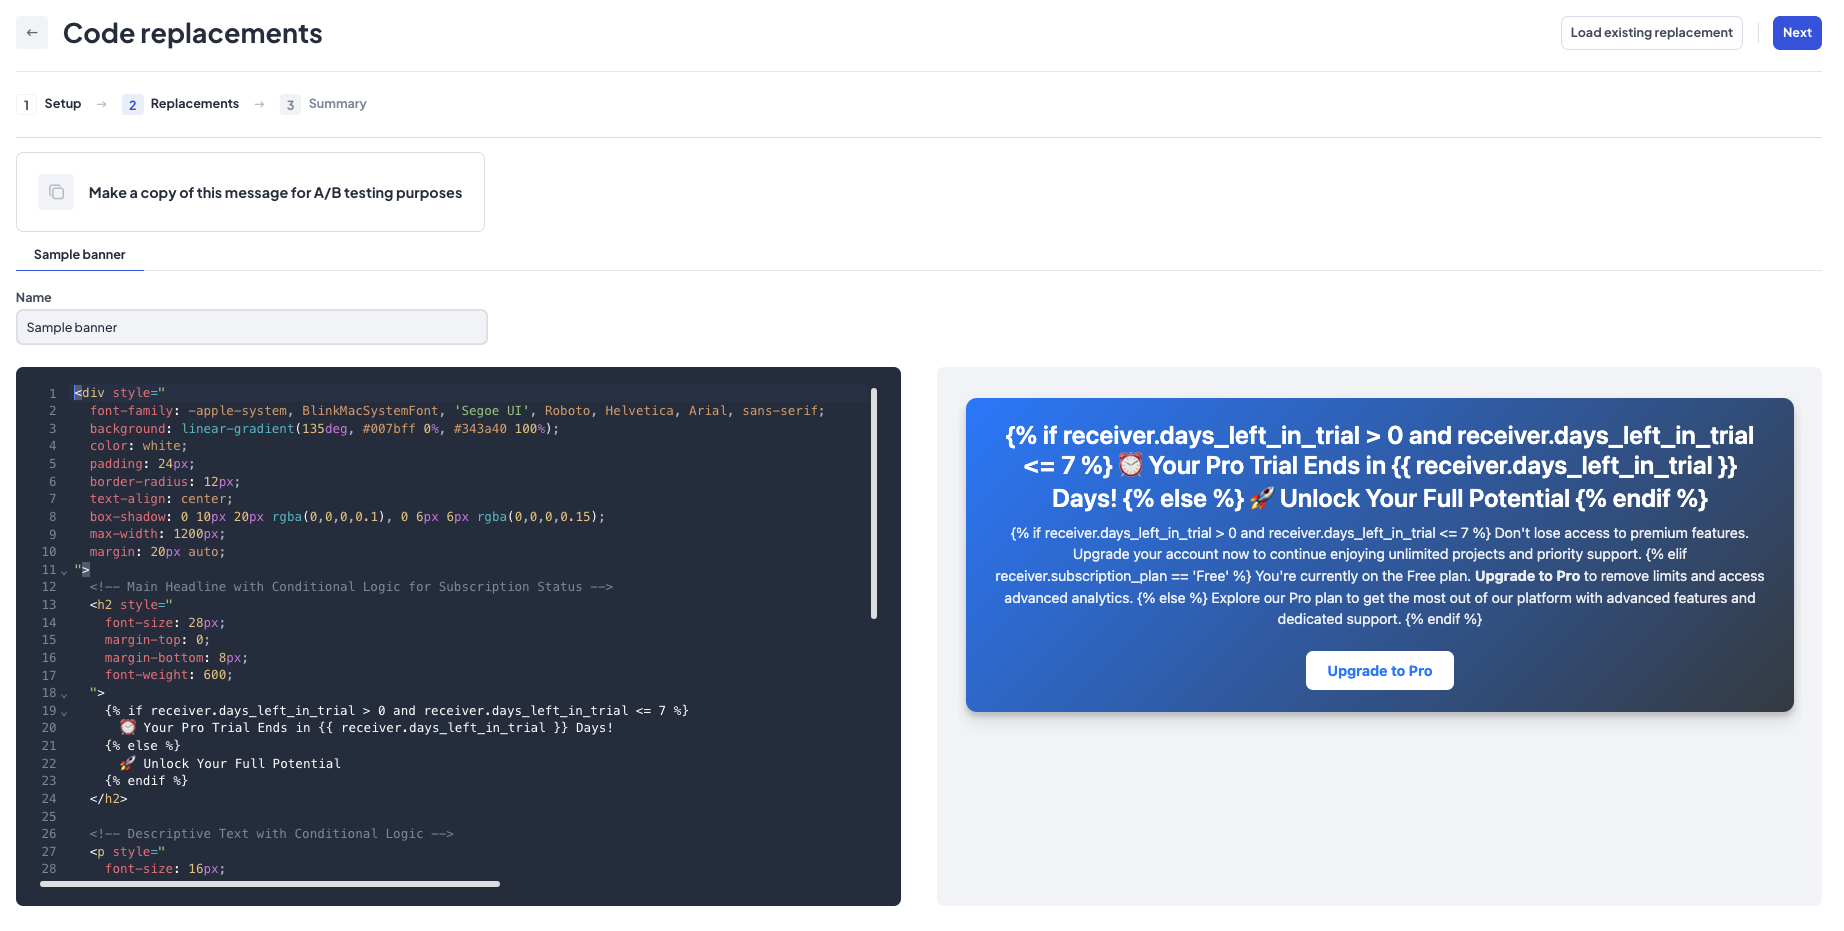
Example: Displaying a Targeted Promo Banner
This script injects a banner into a placeholder div, showing different content based on the user's customer_status attribute.
// Define the placeholder element for our banner
const bannerPlaceholder = document.querySelector('#promo-banner-spot');

// Check if the placeholder exists before doing anything
if (bannerPlaceholder) {
  let bannerTextContent = '';
  let bannerBackgroundColor = '#343a40'; // Standard dark color

  // Check if the user is a VIP using a snippet tag
  if ('{{receiver.customer_status}}' === 'VIP') {
    bannerTextContent = '🎉 VIP Exclusive: You get free shipping on your next order!';
    bannerBackgroundColor = '#007bff'; // Special blue color for VIPs
  } else {
    bannerTextContent = 'Check out our weekly deals!';
  }

  // Create and inject the banner... (code to build and append element)
}
Use Case 2: Triggering on-site logic (Hybrid approach)
This robust and scalable approach uses the "Send code" module to execute a custom JavaScript snippet on your website. This requires a pre-configured onPayloadReceived function on your site that acts as a secure executor for the code sent by User.com. For a clean architecture, the snippet itself should be simple: its only job is to dispatch a CustomEvent containing the necessary user data. The rest of your application then listens for this event, which neatly separates the trigger from User.com and the presentation logic handled by your website.
Advantages:
Decoupled Logic: Keeps your website's presentation logic separate from User.com automations, making both easier to maintain.
Improved Performance: Avoids potential delays from complex DOM manipulation scripts running via User.com. Your site's optimized code handles the changes.
Developer Friendly: Integrates smoothly with modern frontend frameworks (like React, Vue, Angular) which are designed to react to data changes.
Limitations:
Requires Frontend Development: While the
onPayloadReceivedfunction is a one-time setup, your website still needs custom JavaScript written by a developer to listen for theCustomEventand perform the desired content modifications.
Example: Sending a Data Payload to Your Website
The implementation requires two main steps: sending an event from User.com and handling that event on your website.
Step 1: Send code that creates an event
In the "Send code" module in User.com, place the JavaScript code that will dispatch a custom event on your website.
// This code goes into the Send Code module.
// Its only job is to create and dispatch an event with user data.
document.dispatchEvent(new CustomEvent('usercomDataReceived', {
  detail: {
    eventName: 'user_properties_received',
    userRole: '{{receiver.role | default: "user"}}',
    customerType: '{{receiver.company.plan | default: "none"}}'
  }
}));
Step 2: Your website handles the event
Your website must have the onPayloadReceived handler configured as part of your main User.com installation. This function's purpose is to safely execute the JavaScript string (from Step 1) that it receives from the "Send code" module. For detailed setup instructions, please refer to the official "Send code" module documentation.
Once the setup is complete, your application code can listen for the usercomDataReceived event dispatched in Step 1.
// This code also lives on your website.
document.addEventListener('usercomDataReceived', function(event) {
  const payload = event.detail; // Get the data from the event
  console.log('My application received data:', payload);

  if (payload.eventName === 'user_properties_received' && payload.customerType === 'VIP') {
    const banner = document.getElementById('dynamic-banner');
    if (banner) {
       banner.textContent = 'A special offer just for our VIPs!';
       banner.style.display = 'block';
    }
  }
});
Key considerations & best practices for automations
When using the "HTML block" or "Send code" modules, it's important to understand the following behaviors and best practices to ensure your automations run smoothly:
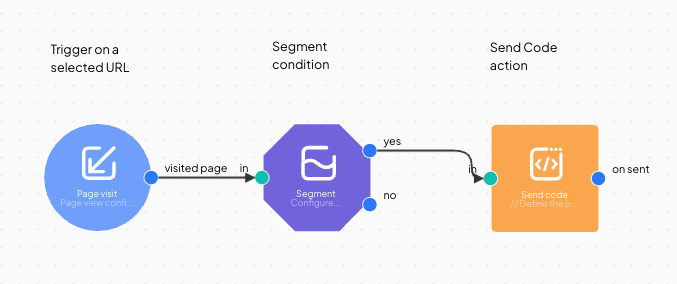
Automation dependency & delays: Both modules only activate when their parent automation is triggered. The timing is subject to the automation's logic and the User.com platform's processing queue, which can sometimes result in minor delays, especially for direct content manipulation.
Cross-tab behavior: An automation action will activate across all open browser tabs where the User.com widget is loaded for a given user, not just the tab that triggered the event.
Use direct manipulation for targeted content, not global elements: The direct manipulation approach is designed for dynamic content aimed at specific user segments or pages. It is not suitable for permanent, site-wide elements that must appear instantly for every visitor. For permanent, global content, it's best to build it directly into your website's code.
Use segments over filters: For better performance and reliability, use the "Segment" module to define your target audience rather than the "Filters" module within your automation.
The "Recommendation Box" module
This is a specialized, advanced feature for direct content manipulation. It uses User.com's prediction models to display personalized product or content recommendations. While powerful, it is configured within User.com and serves the specific purpose of showing recommendations. Learn more about implementing the on-site Recommendation Box.