Integromat: How to use it with User.com?

You need to connect an external tool to User.com? See how to do this with Integromat.
Integromat is a platform serving integration of external tools, apps, systems or automations and exchanging the data between them.
If you need to exchange the data from User.com, for example to the Google Sheets, or data about new registrations, comming from the Cognito Forms, in this article you will find the exact instructions how to achieve this.
Introduction
Connecting User.com with external apps will commence via the REST API of User.com. You can imagine, that the app we will build in Integromat is same as a graphical interface for the functionalities provided by our API.
You can read about it's functionalities in here:
In order to establish the connection between the User.com and the external app, we will require the following:
- Creating account on Integromat platform
- Creating new app in Integromat
- Add the module that will execute all the necessary actions
- Action scenario that will decide about the trigger and the task queue.
Creating the app
After creating the account, you have to create a new app. In order to do this, in main Integromat view, choose My Apps and next, on the top - right side of the page click Create a new app.
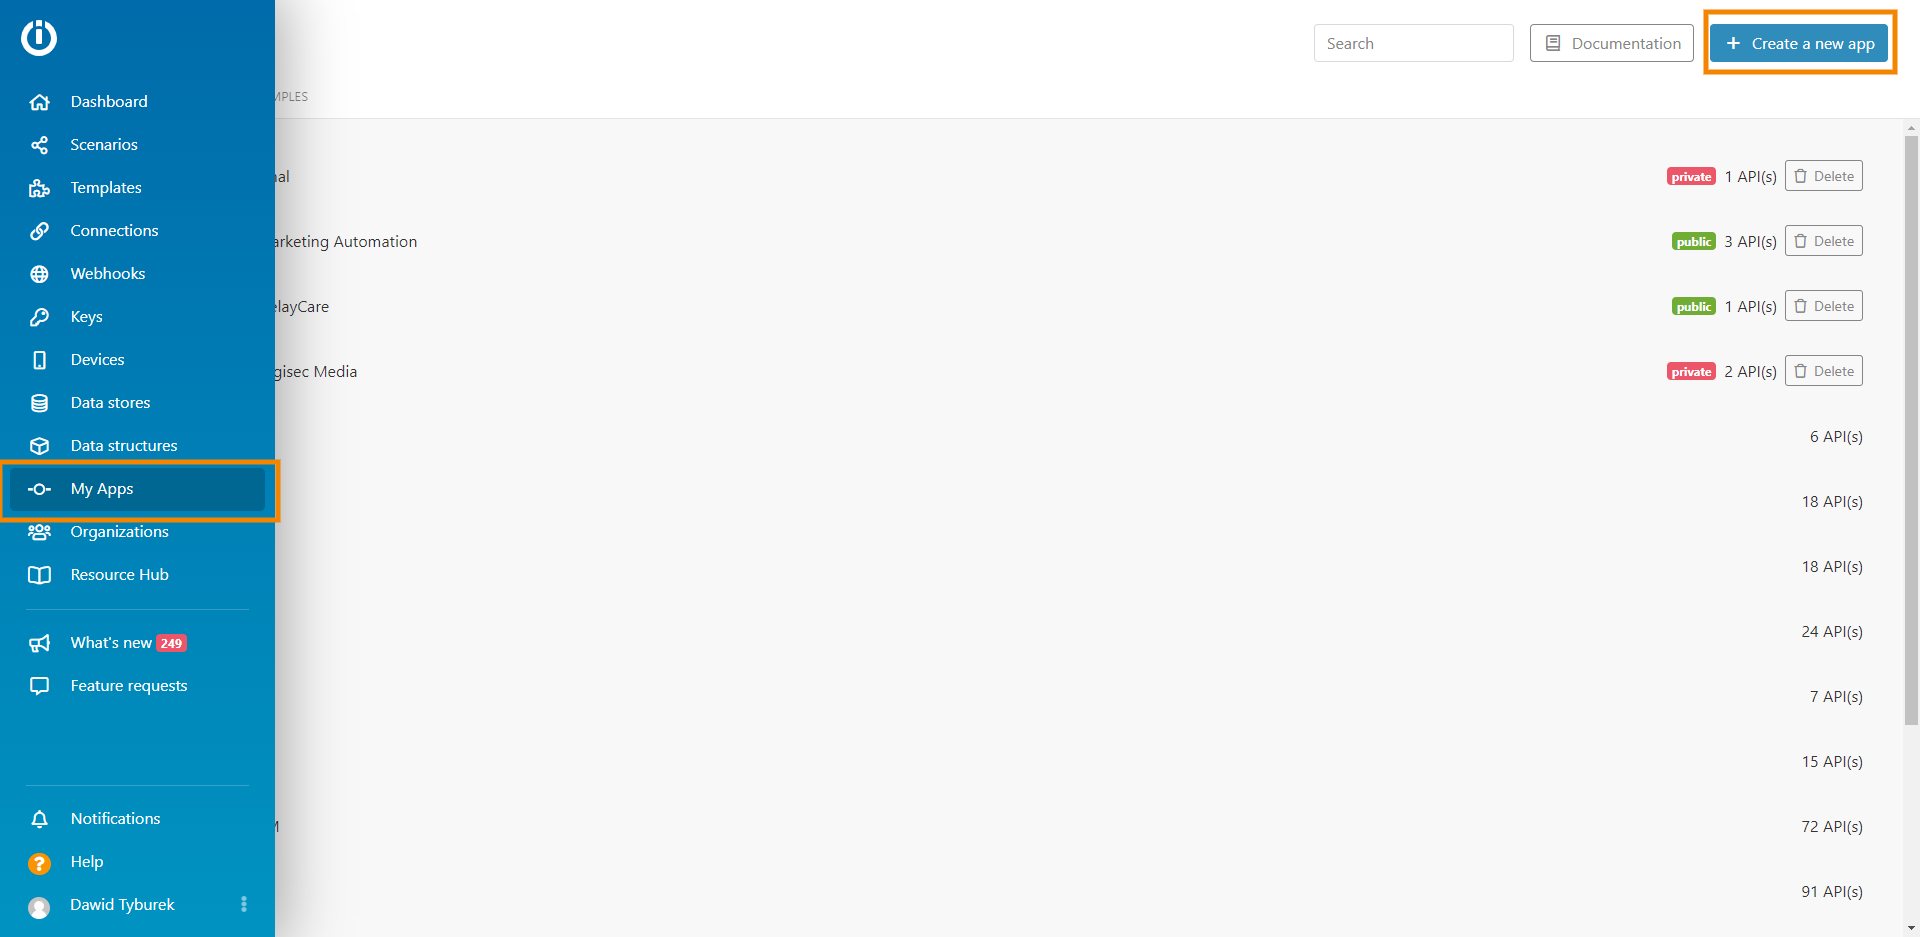
A new app creator will be displayed. You may leave the default values or change your app name. Those settings can be altered later on. After saving you need to wait a few seconds for the changes to take effect, and go to My Apps tab. If the newly created app is already on the list, you should click its name to open the edit view.
 All the new apps will follow the settings shown above. We will modify the Base, Connections and Modules tabs.
App Configuration
Pieces of code that will appear in the article from now on are ready to use and you can copy them freely to easily create your app and modules.
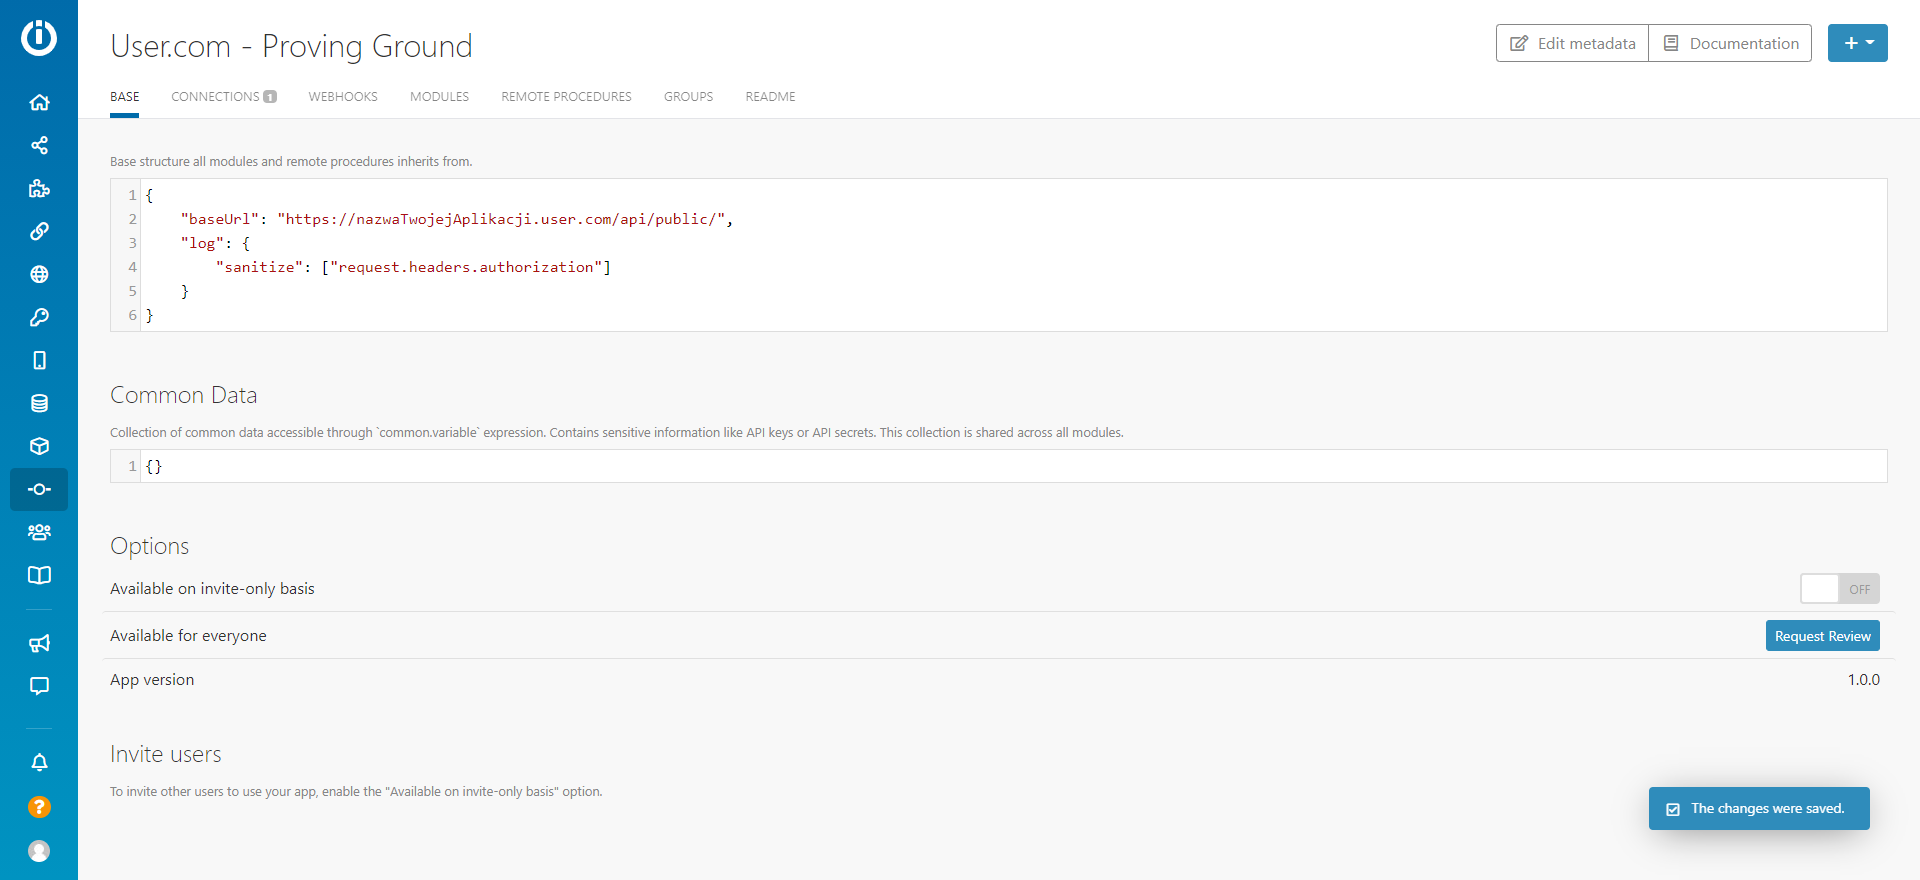
On the BASE tab let us modify the content of the upper input area. It is responsible for the default connection settings of the Integromat with User.com. This input will be inherited by all the other app settings.
The baseUrl is a standard url value, which will be the beginning point to all the API requests. You fill find more about this in our API User.com documentation. Code that you need to paste in the BASE tab is:
{
	"baseUrl": "https://nazwaTwojejAplikacji.user.com/api/public/",
	"log": {
		"sanitize": ["request.headers.authorization"]
	}
}
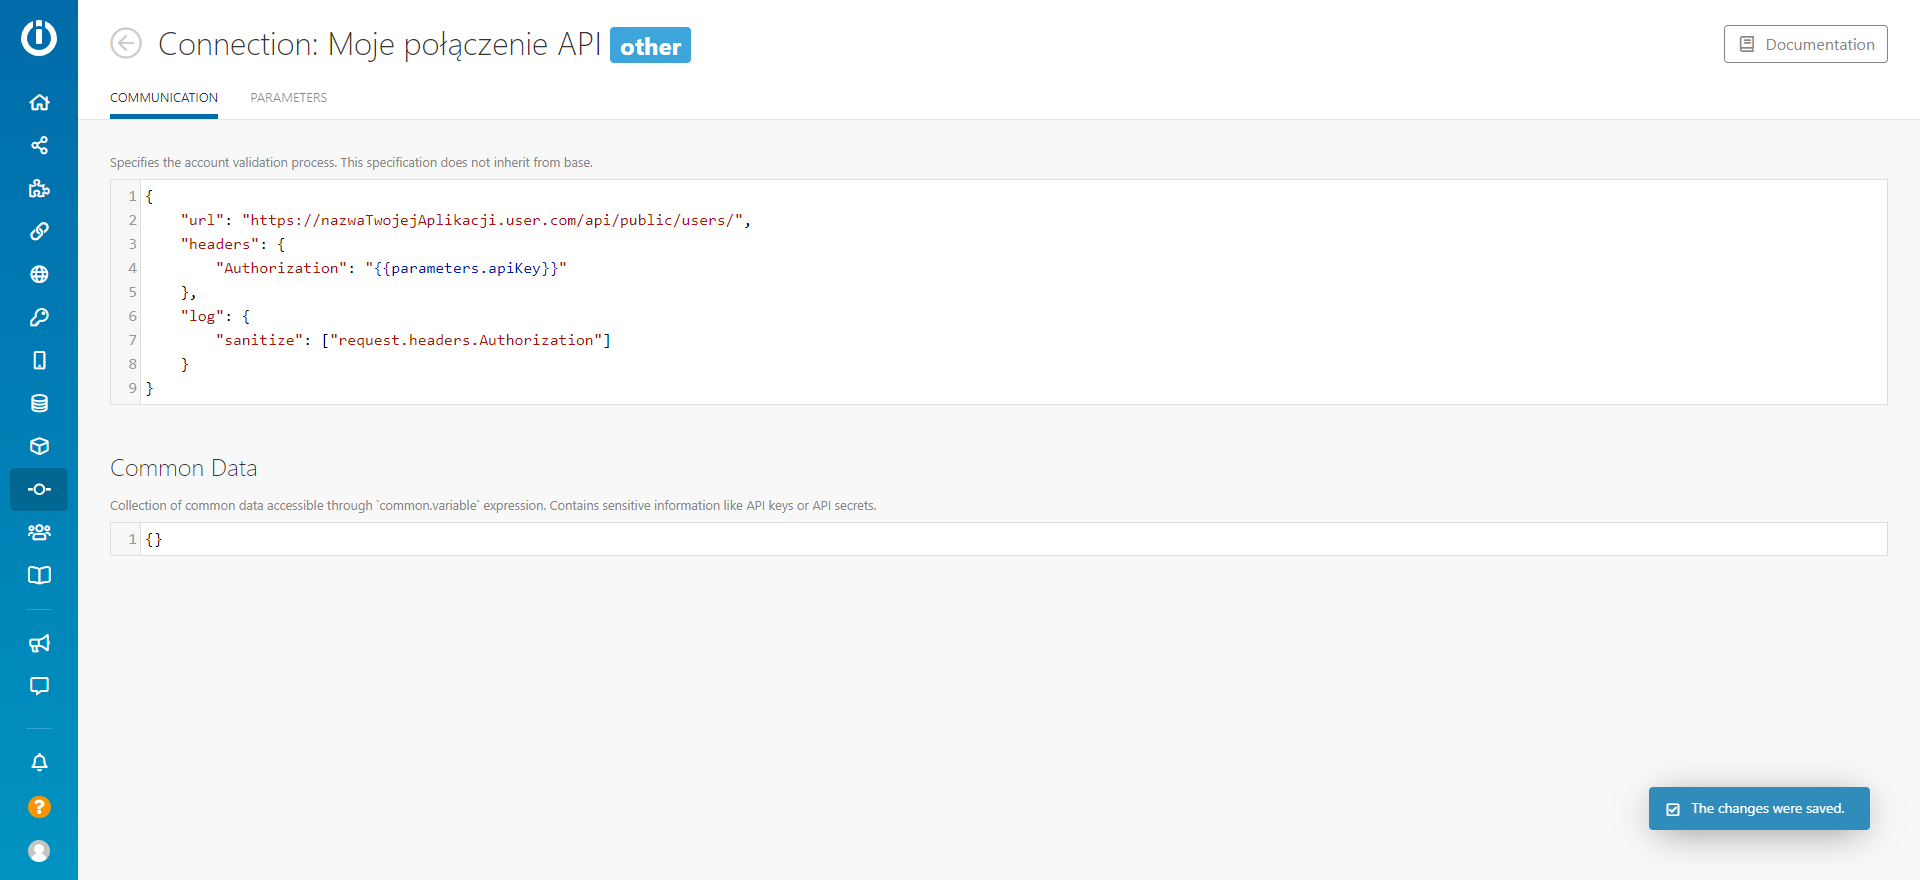
Every Integromat app needs at least one way to verify and establish connection with an external tool. In this case - User.com. We go to the Connections tab.
Let's click Create a new Connection, and and input the corresponding value for the Label field. In the Type field we choose the API Key.
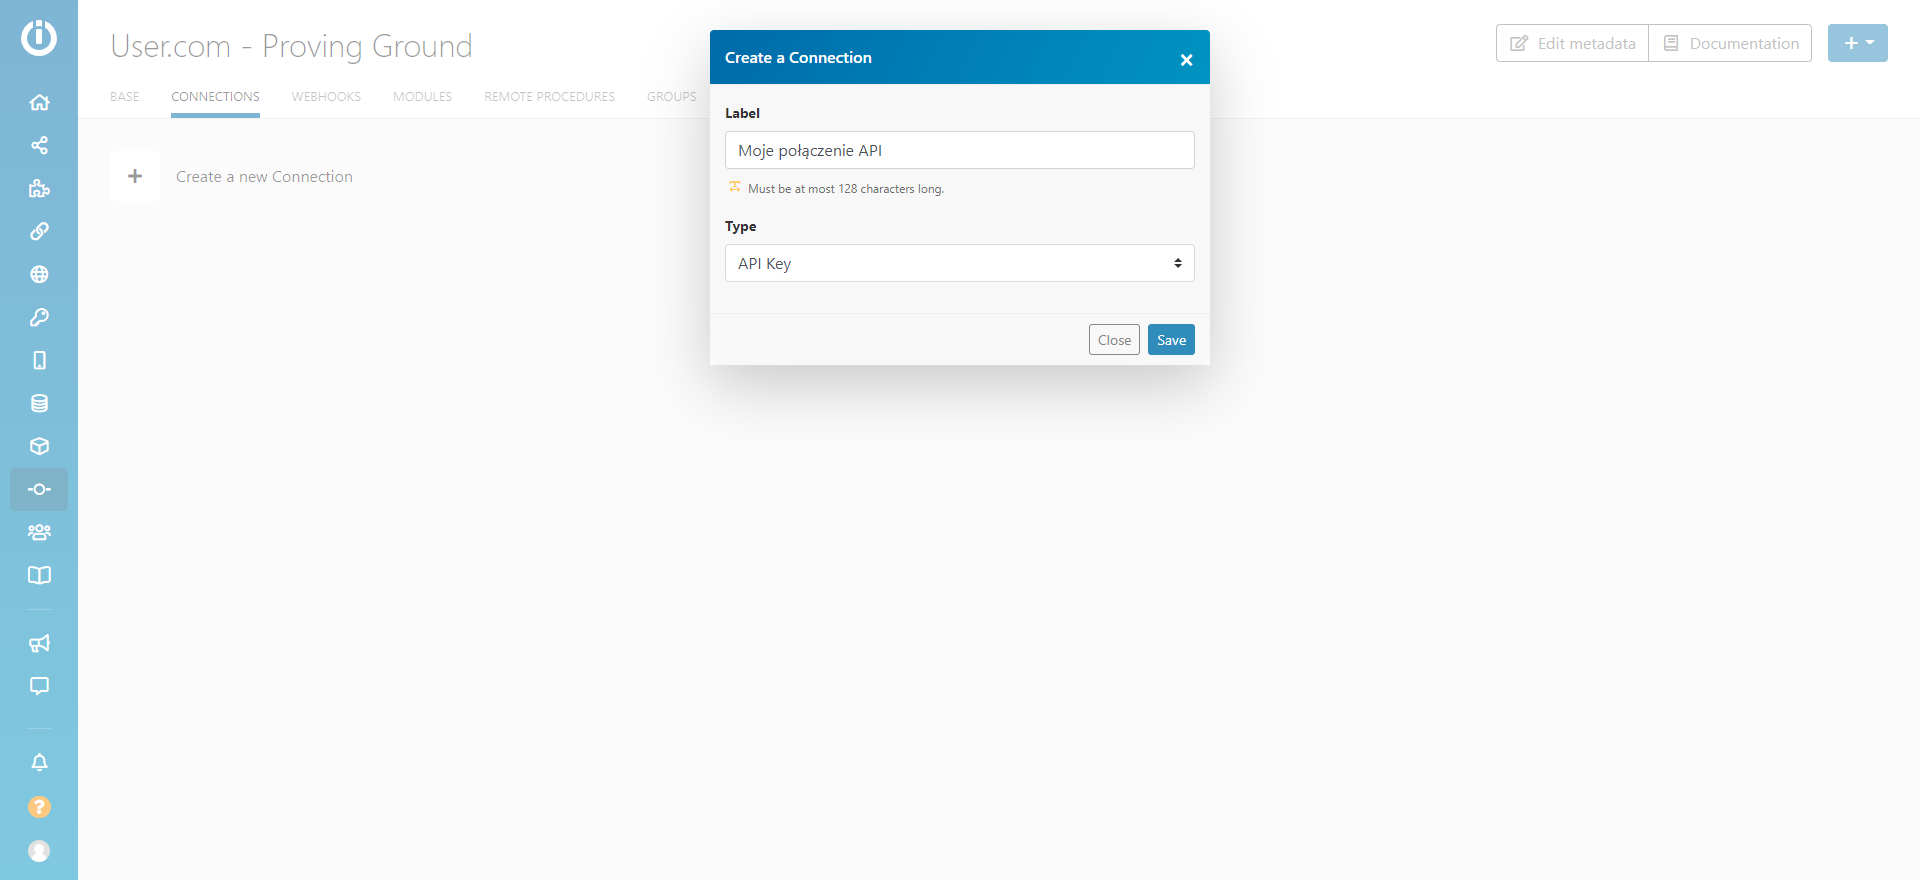
On the new window we will configure the way that our app in User.com will allow the connection with the Integromat app.
We will create our connection using the rules required by the User.com API. We need the base URL address again and additionally, the Header. We will save there our scenario consisting from 64 signs API Token, generated in our User.com app. We will deal with the token in the next steps.
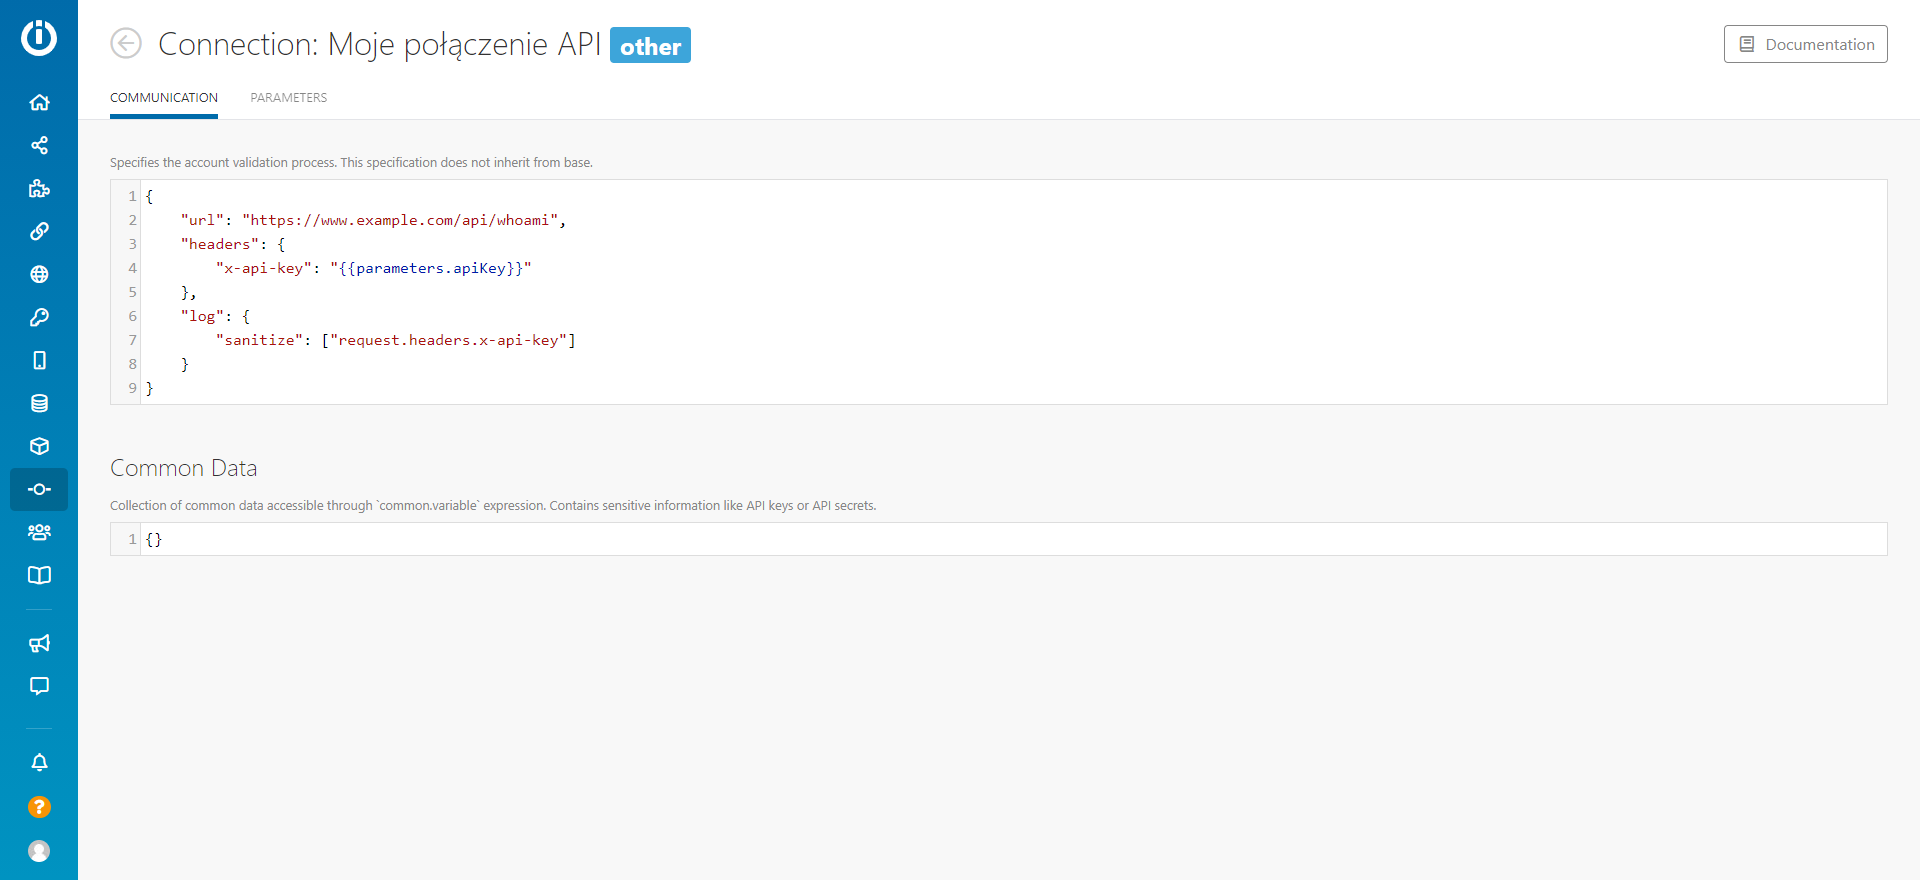
The code to paste in the Communication tab is:
{
	"url": "https://nazwaTwojejAplikacji.user.com/api/public/users/",
	"headers": {
		"Authorization": "{{parameters.apiKey}}"
	},
	"log": {
		"sanitize": ["request.headers.Authorization"]
	}
}
After saving, the Integromat app is ready to use. Let's click the "back" arrow in the top left corner and let us move to creating ghe mudules, meaning the functionalities of our application.
Creating the module
We move to the Modules sections and we click Create a new Module. The configuration window will appear.
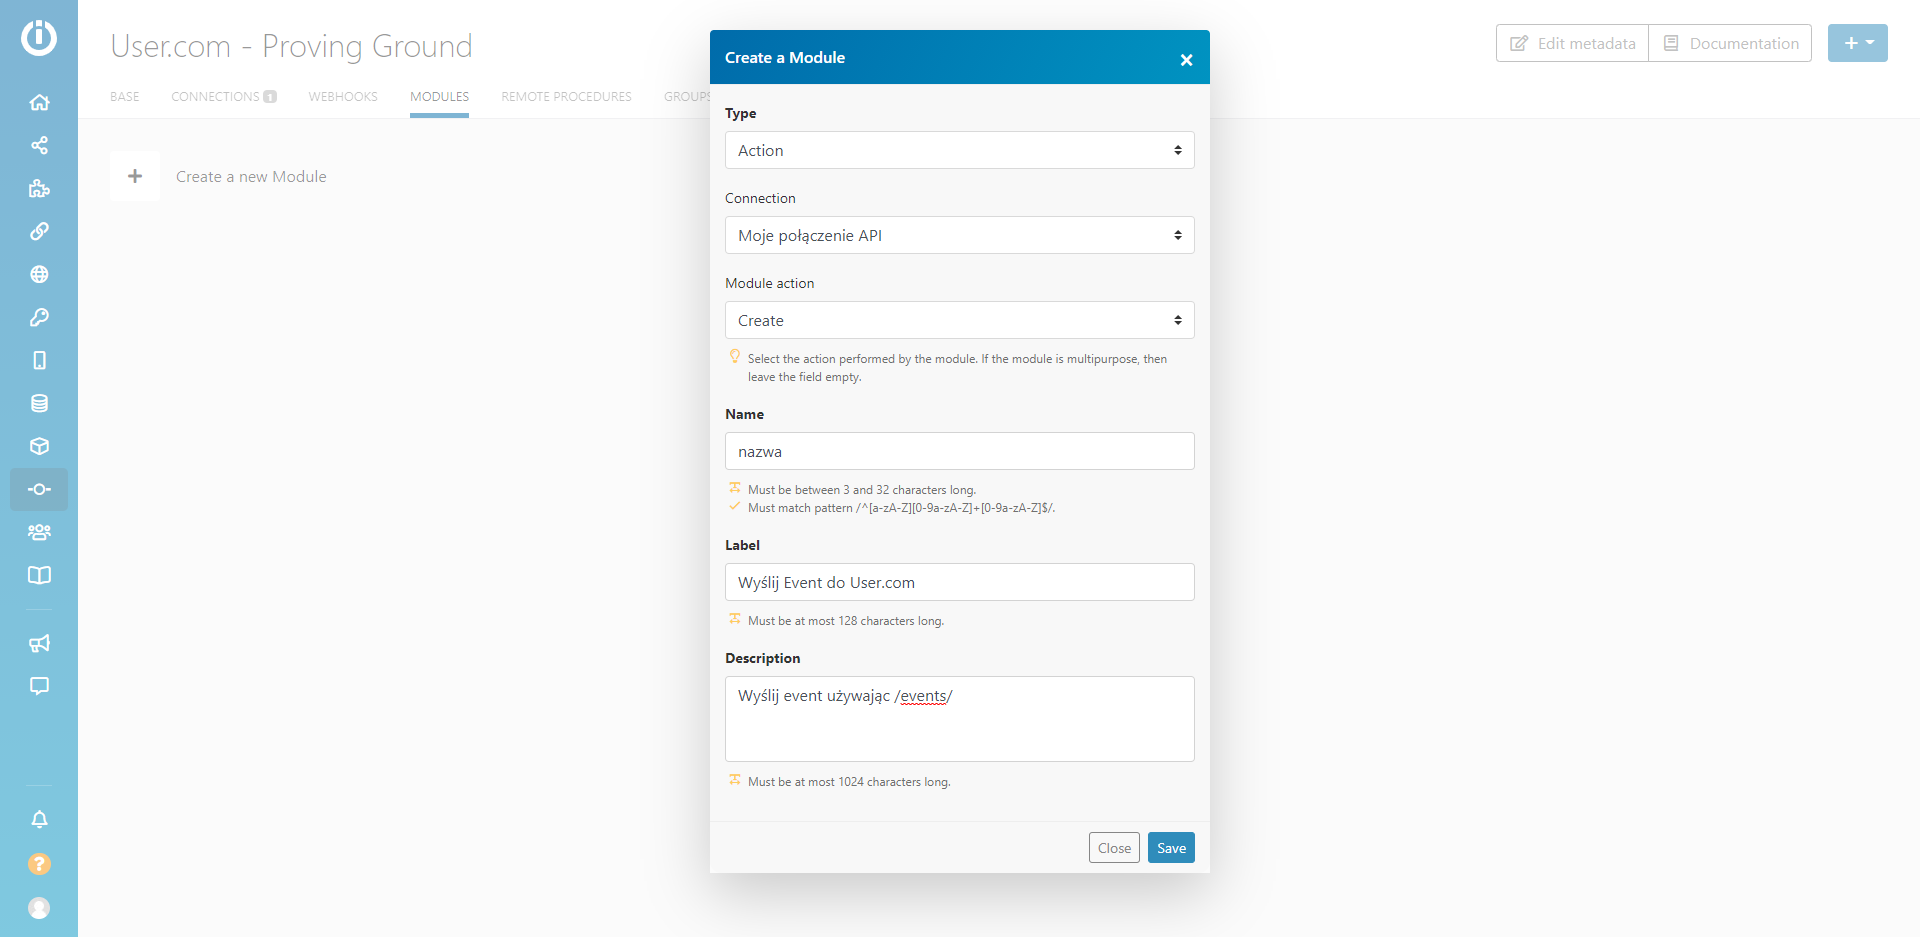
The right configuration of this window is imperative for the functioning of our module.
- Type - Is responsible for the type of activity, that the module executes. For our purpose, it will always be Action.
- Connection - is responsible for the connection method used by the module. We choose the connection that we have created in the previous step.
- Module action - we are choosing the action types to be executed through the User.com API.
- Types of actions are described in the specific API endpoint documentation. For example - here
- POST -> Create
- GET -> Read
- PATCH -> Update
- DELETE -> Delete
- Name - Internal name of the module.
- Label - displayed module name. Visible, for example, while creating the scenario.
- Description - You can put your description here.
Type of action performed by the API User.com can be checked in specific endpoint documentation, like here:
After inputing the data, we are saving and moving to configuration.
Module configuration
We can configure the data, that we will send to the User.com app.
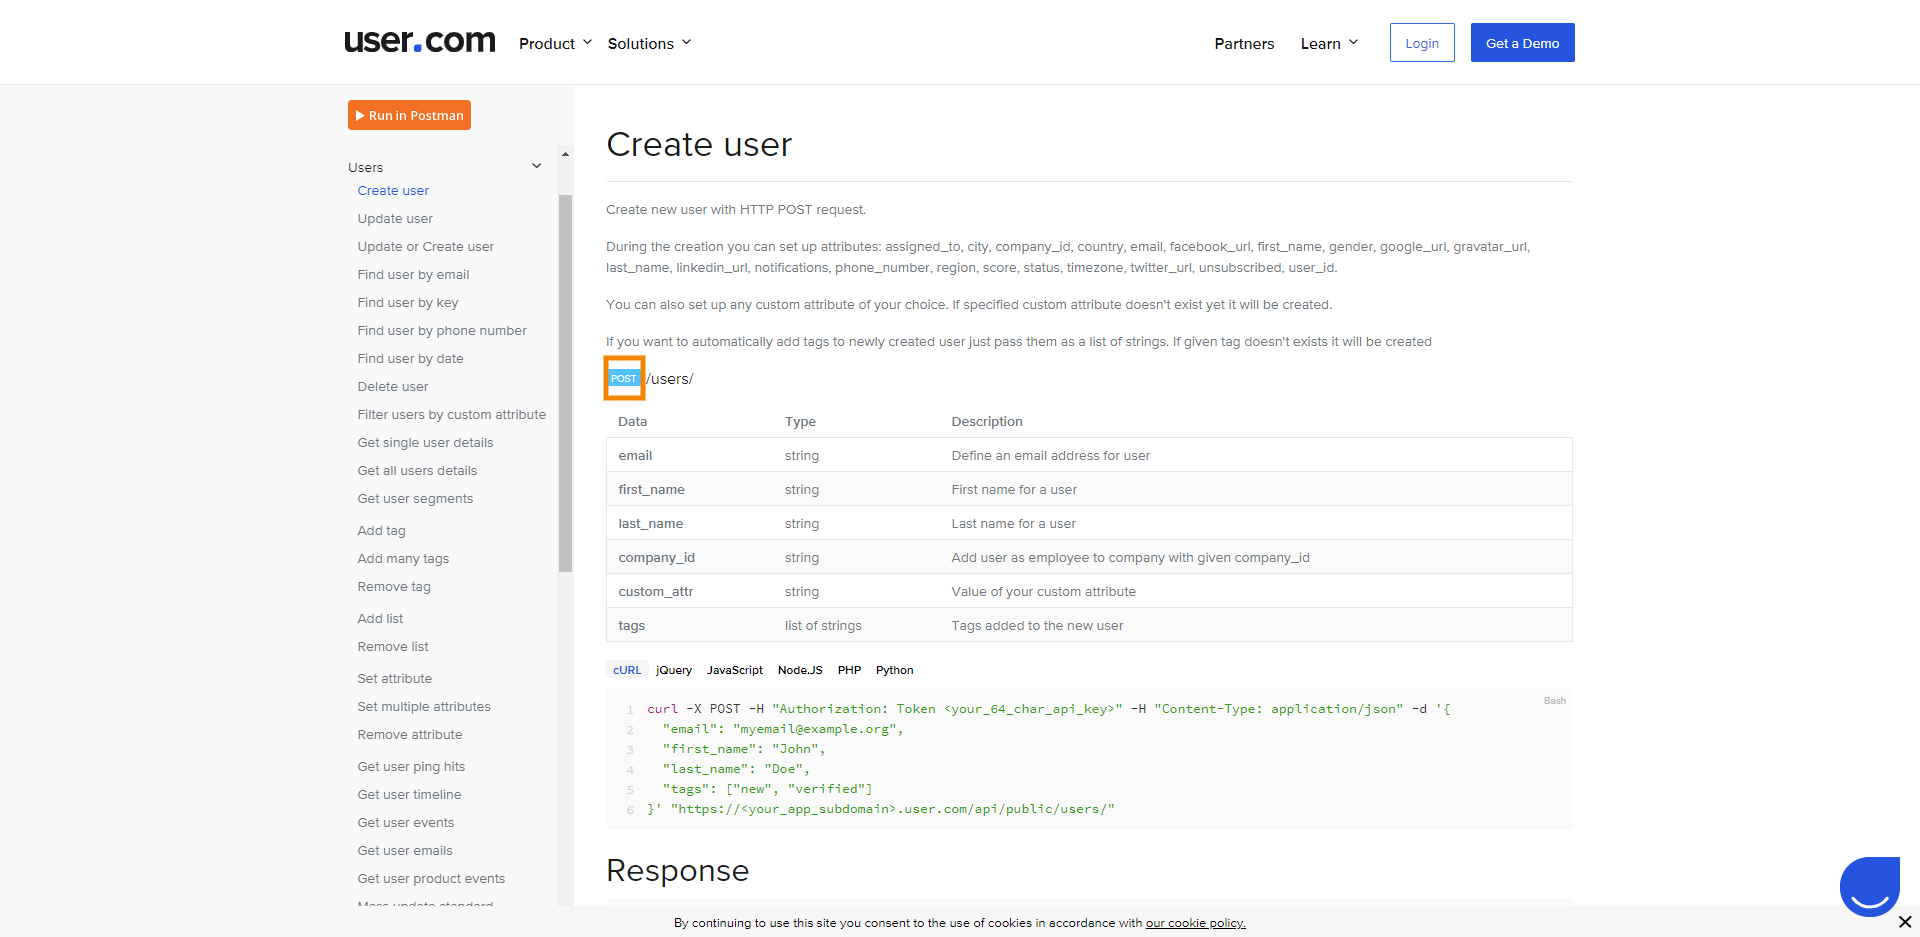
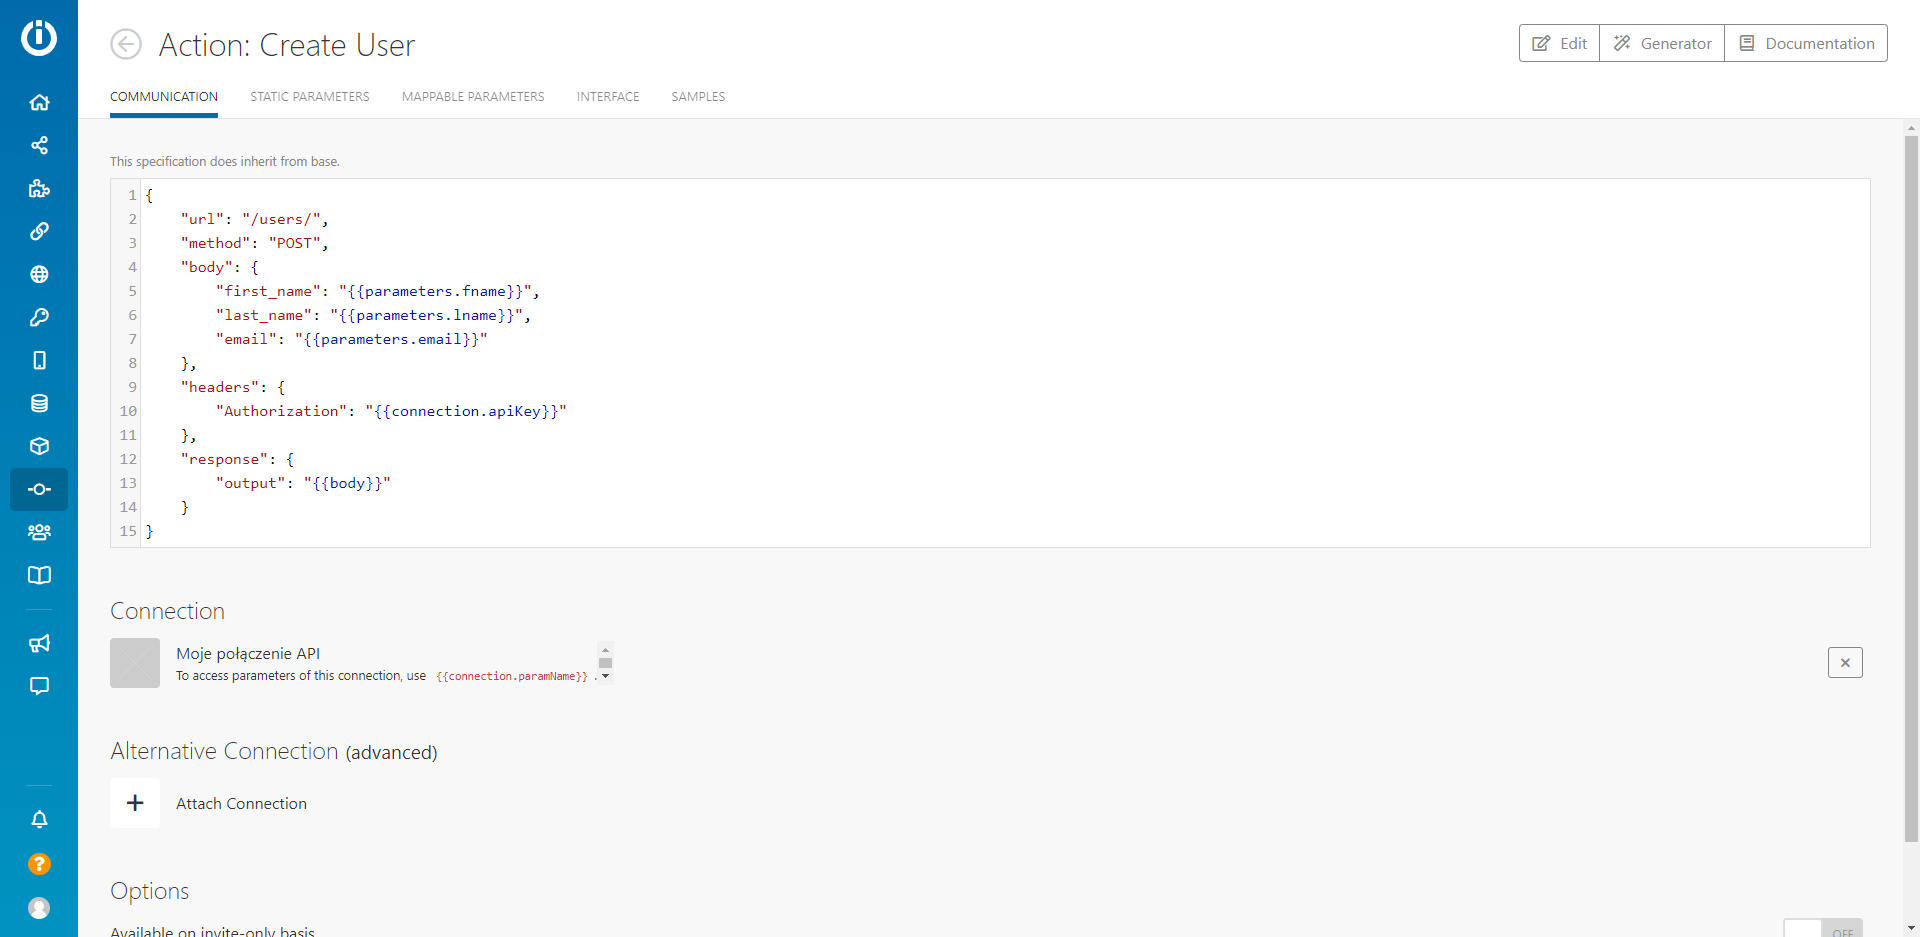
For the purpose of this article, we are using the Create User endpoint. It allows for creating a new user, utilizing the parameters obtained from the external tool. We can use any of the User.com endpoints in Integromat, though.
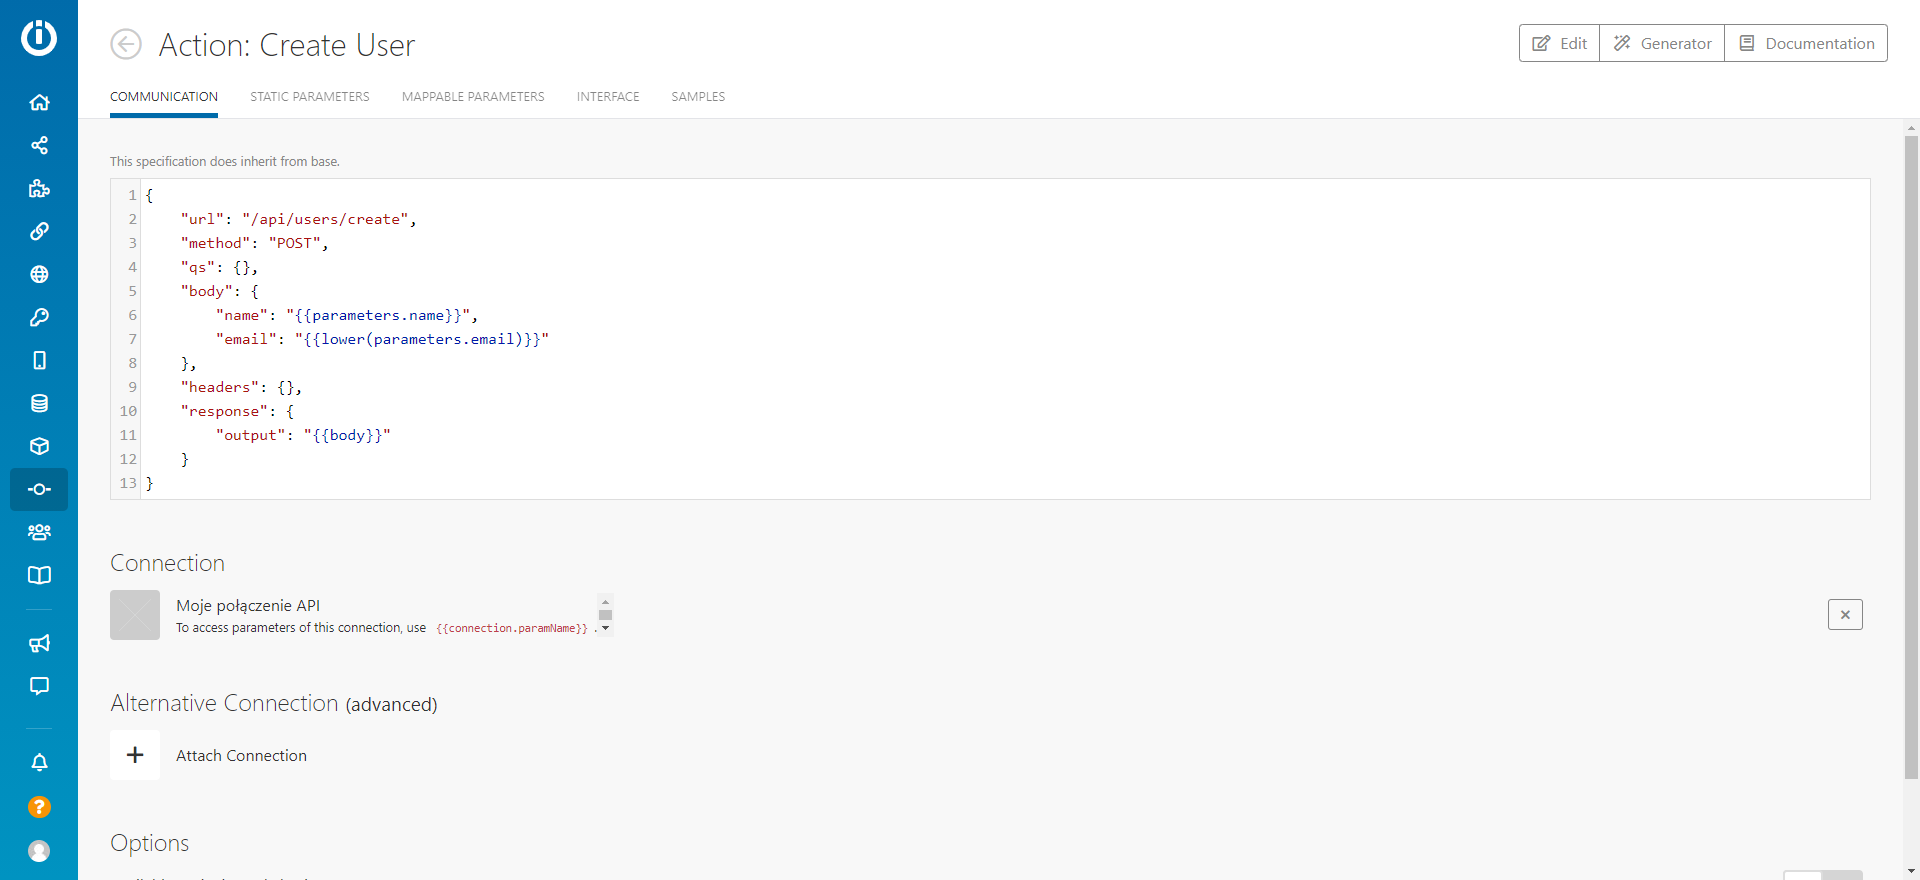
We need to modify the url, body and headers values. They will be assigned while creating the scenarios. We will deal with this in the next step.
As a url value, we input the endpoint address, available in API User.com documentation. In this case:
/users/
As a body value, we input the data which we want to pass to User.com. For example - an Event name, and (optionally), it's attributes. In our case:
"first_name": "{{parameters.fname}}",
"last_name": "{{parameters.lname}}",
"email": "{{parameters.email}}"
As headers value, we input the header required for automating the connection with User.com app. In our case:
"Authorization": "{{connection.apiKey}}"
The code for the Communication tab is:
{
	"url": "/users/",
	"method": "POST",
	"body": {
		"first_name": "{{parameters.fname}}",
		"last_name": "{{parameters.lname}}",
		"email": "{{parameters.email}}"
	},
	"headers": {
		"Authorization": "{{connection.apiKey}}"
	},
	"response": {
		"output": "{{body}}"
	}
}
Now let us move to the Mappable Parameters tab.
In this window we configure the data that we will send to User.com. It could, for example, be an event name, user id of the receiver, user email or type of subscription plan, that he is interested in. Mappable Parameters will be mainly used in the body section. However, depending on the endpoint, we can also need, for example, ID of the email campaign to the url section, in order to get it's statistics. In our case, this section will look as follows:
[
	{
		"name": "email",
		"type": "email",
		"label": "Email address",
		"required": true
	},
	{
		"name": "fname",
		"type": "text",
		"label": "First Name",
		"required": true
	},
	{
		"name": "lname",
		"type": "text",
		"label": "Last Name",
		"required": true
	}
]

The module is ready, it is time to create a scenario.
Creating a scenario
In the side Integromat panel, we choose Scenarios and next, Create a new Scenario:

We go to the automation scenario creation screen. Here we will build the automation path, connecting the systems. We can just simply pass the data, but we can also parse, modify, iterate by the collection, or format.
In our example scenario, we will build an automation, that will add a new row to the Google Sheet. Then it will send a specific event to the User profile, using the data from the Google sheet. Connecting the Sheets with Integromat is not within a spectrum of this article, but same principles apply, as in typical authorisation with the Google ecosystem software.
We click on a "plus" icon, and we search for the Google Sheets on the app list supported in Integromat.
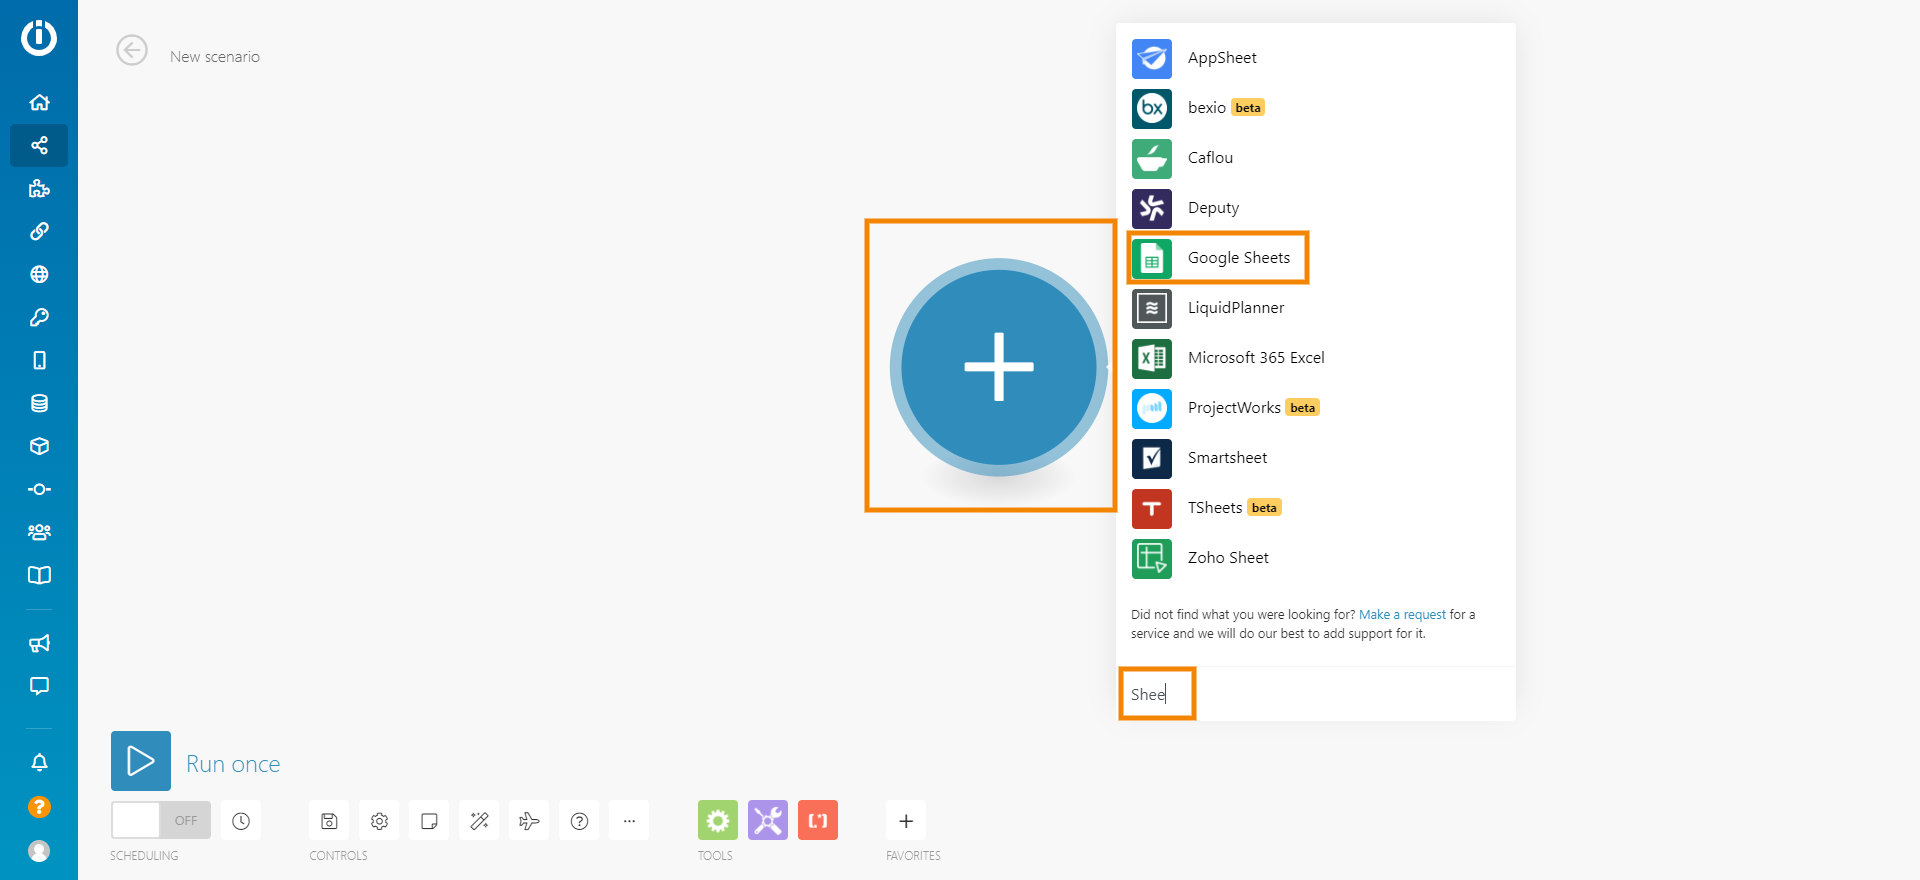
Example configuration with Google Sheets:
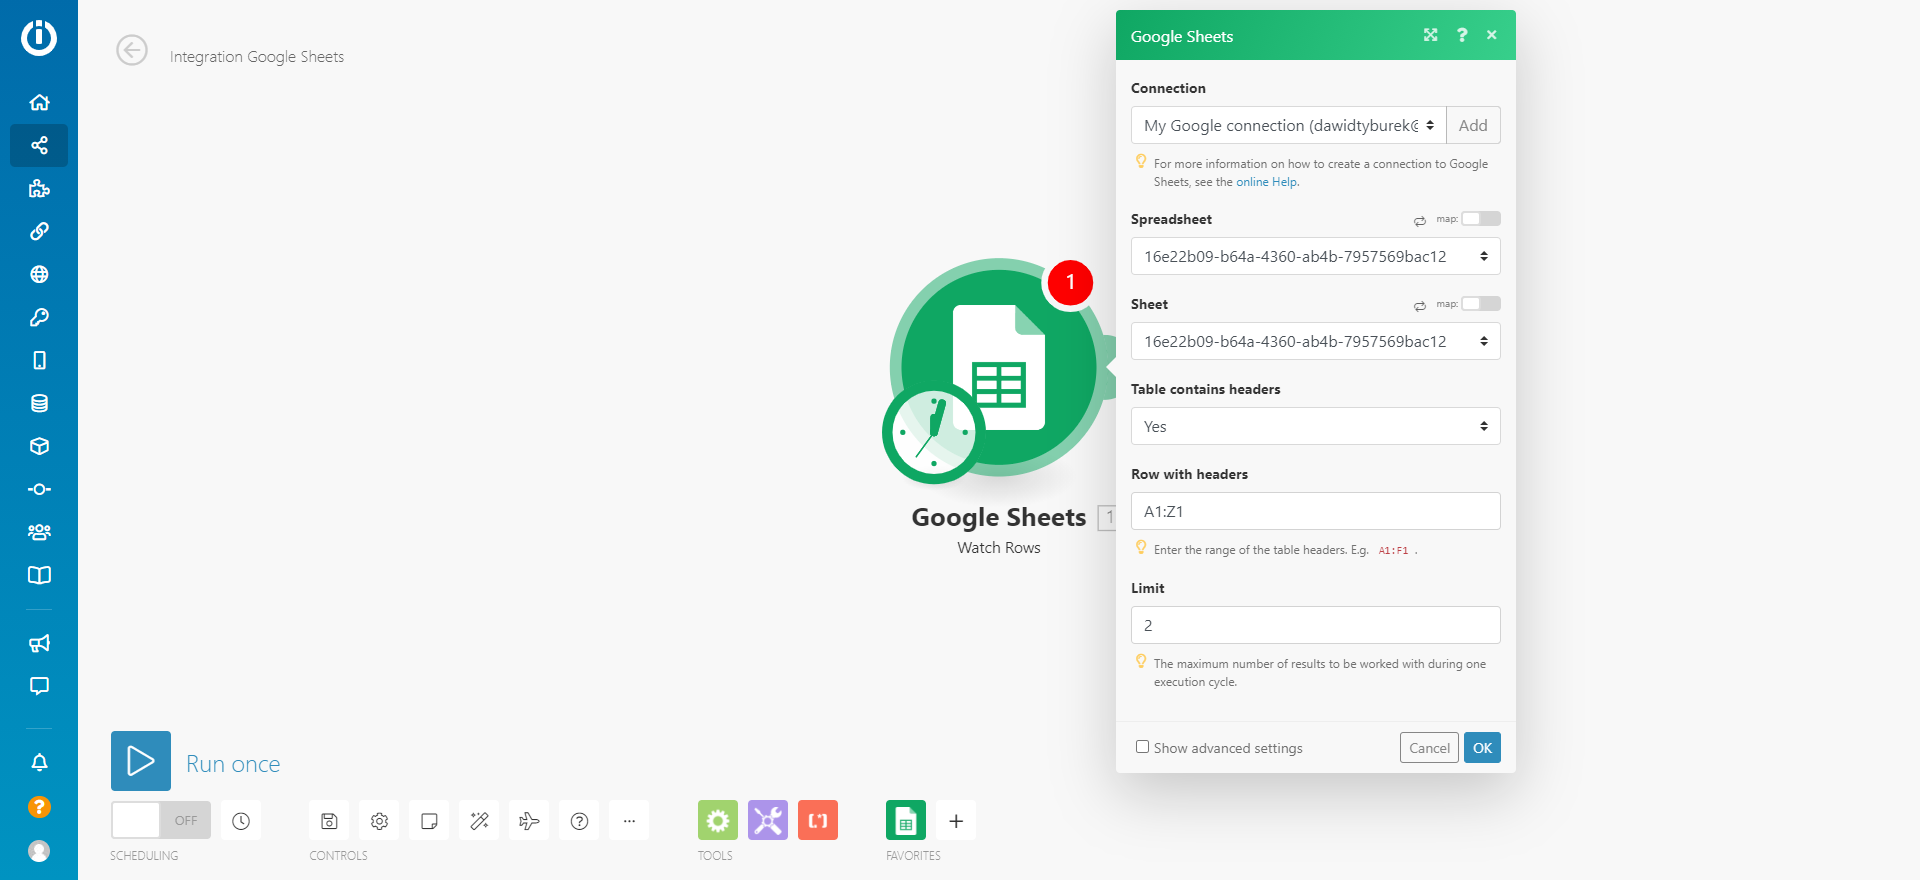
After finishing the configuration, we click OK and add a new module. Then we can search for the app and module created in the previous steps. Then we provide the API Token, which will authorise the connection (it is only required once, when configuring this module for the first time. The Token can be generated or found in our User.com application in the following section:
Settings -> App Settings -> Advanced -> Public REST API Keys or https://nameofyourapp.user.com/api/credentials/. If the key is not visible, just generate it by clicking the Create API Key button.
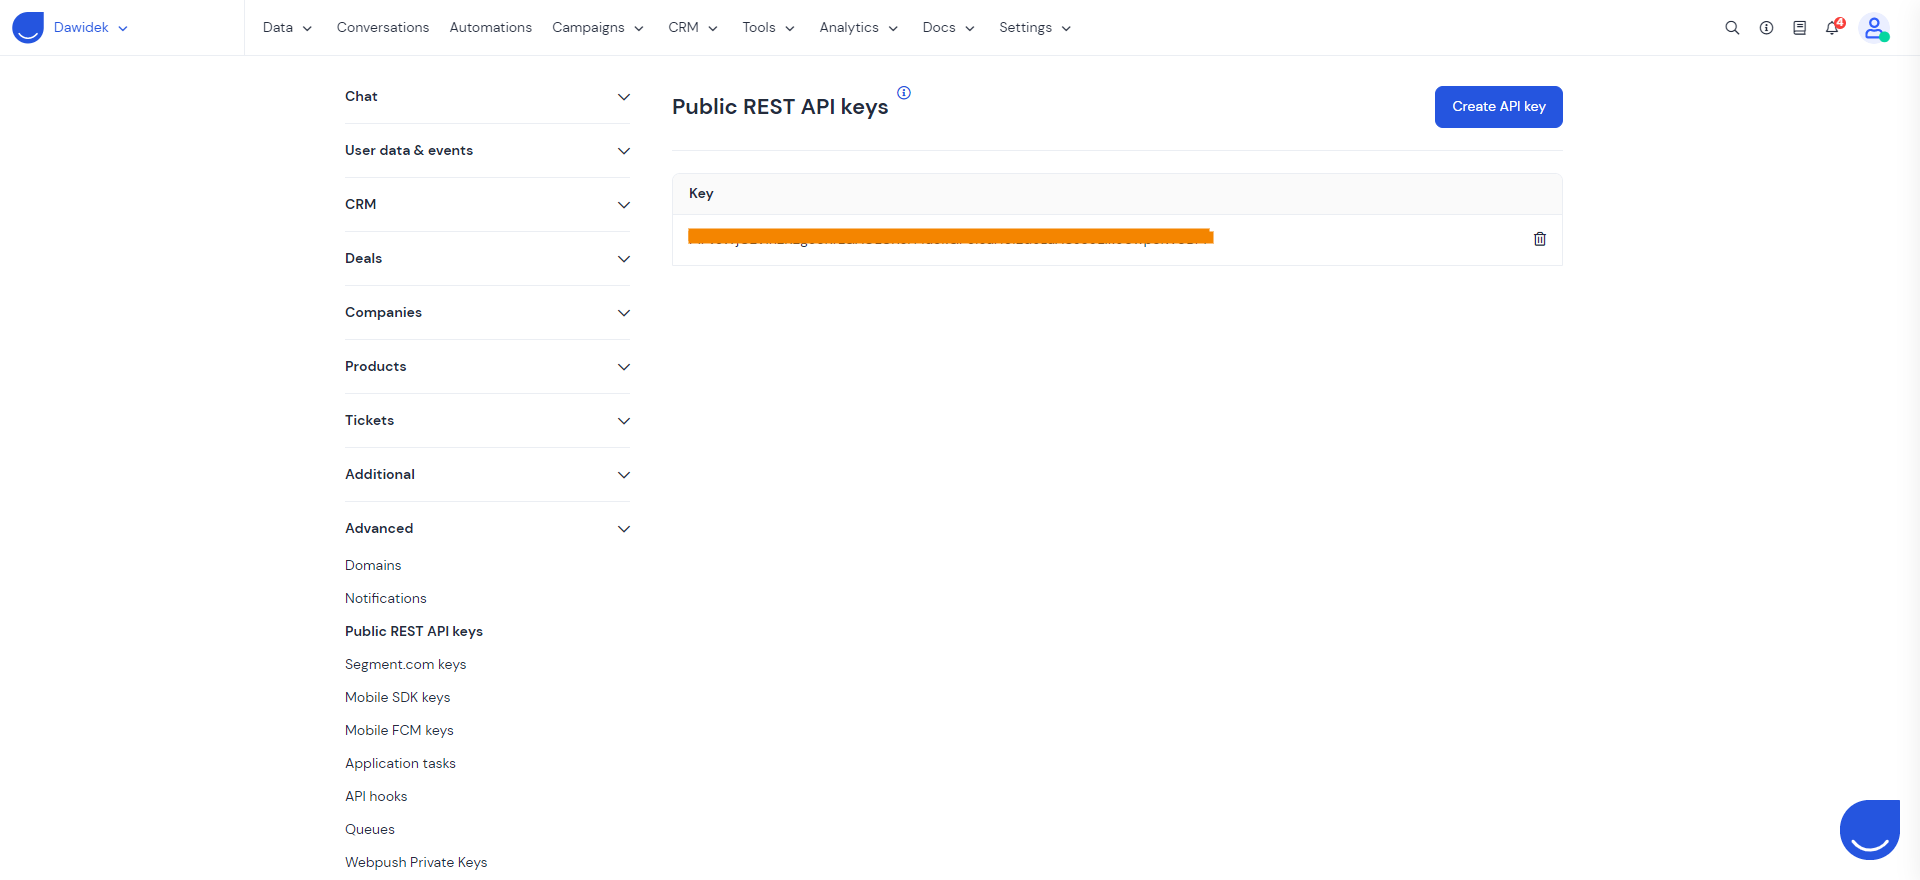
The key needs to be pasted in the Integromat configuration field, always remember that User.com API requires the work Token before the actual token.
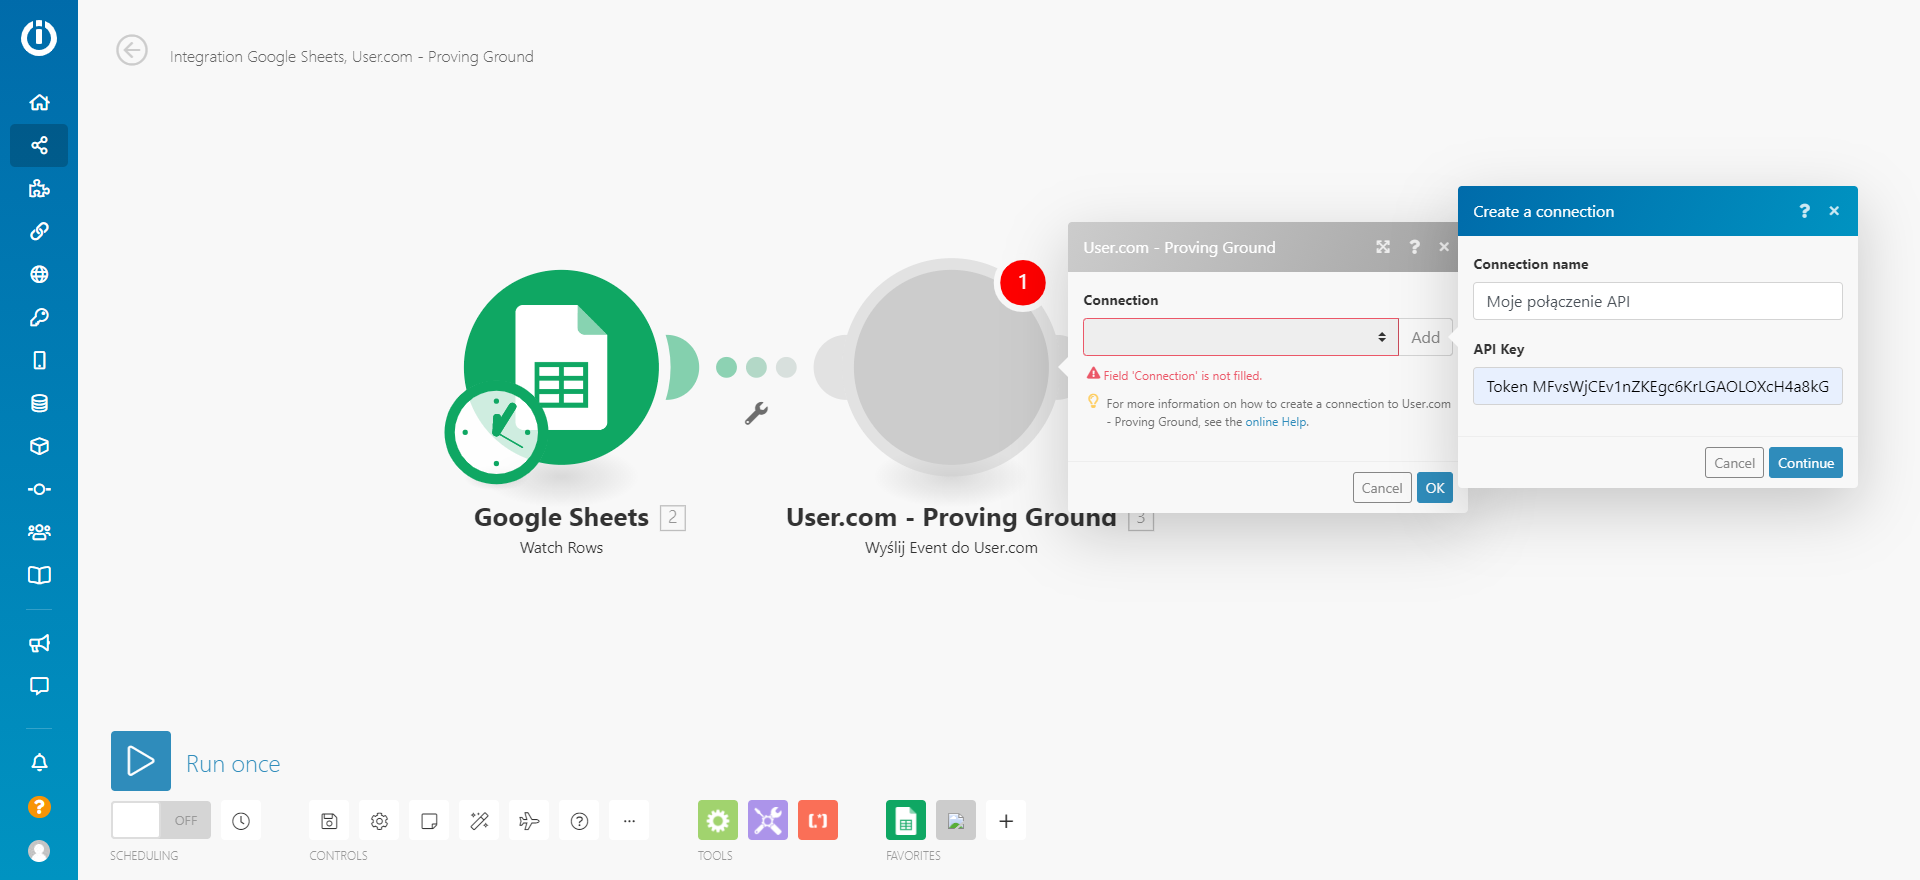
Then let's click "Continue". A short validation will take place. If the connection with User.com app will be established, it will be shown in the module window. If the error appears (like 404), then most likely:
- There are white signs in the API Key, or the word "Token" is missing.
- There is an error in base URL in the module configuration, or in Integromat app.
- There is an error in the headers section. For example - wrong Authorization.
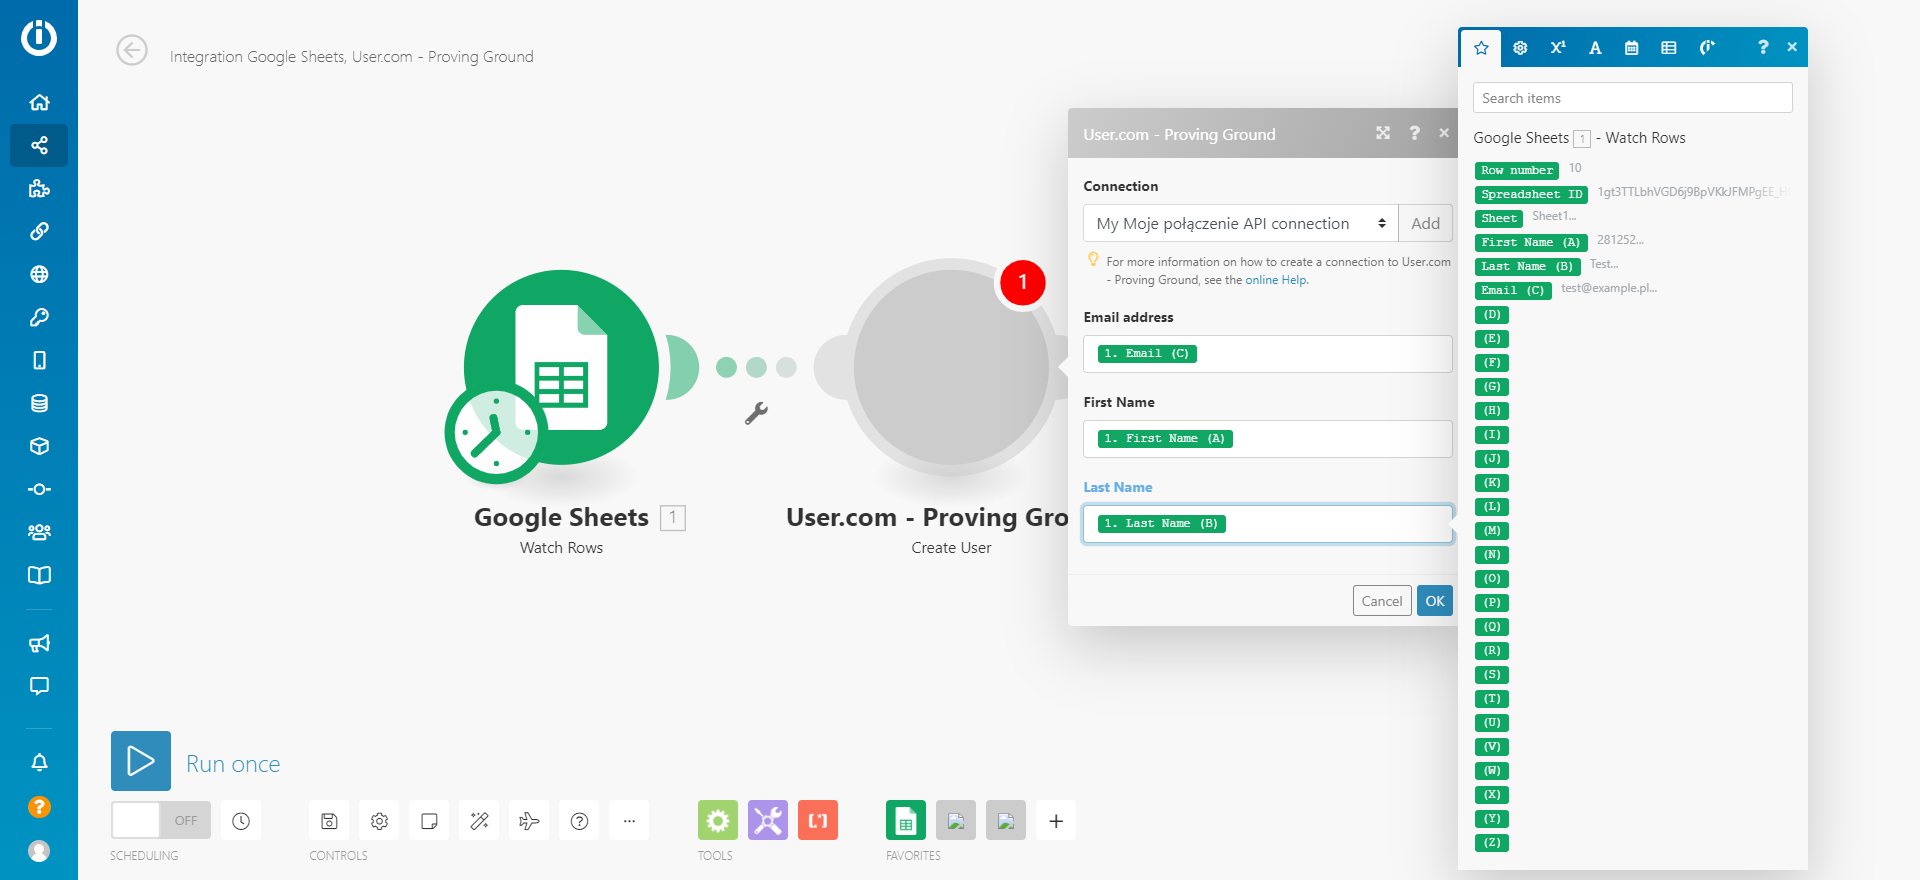
When the configuration succeeds, we will see a window where we can choose the event parameters. We can send their values directly from the specific Google Sheets cells.
After configuring the module, we click on "Run Once" in the bottom left corner. Now we can check our integration in action.
When it comes to the specific example that we have discussed in this article, we should create a new user in User.com, using the data from the Google Sheets file.