Landing pages

Learn all about creating and setting up Landing Pages
To enter Landing pages editor, click: Tools > Landing Pages

Next, choose Create new landing.

Landing page information will open. Here, you can fill in the name, category, and a short description of your landing page. Then, click Next to go to Landing page templates.

Landing page templates
You can choose from ready-to-use templates or you can build your landing page from scratch. Templates are grouped into categories: Common, Real Estate, etc. If you choose All, you will see all available templates.

After choosing a template, you enter the Editing page. This page consists of two sections:
Left side - your landing page preview.
Right side - tools for customizing your page.

Moreover, the landing page consists of two elements:
Homepage - main landing page.
Thanks page - a page that we redirect a user to after submitting the Landing Page.

For the landing to work and collect data, you must use at least one input using User or Company module and a maximum of one submit button.

Submit button collects all data from inputs regardless of the model and their quantity.
After dragging the module to the landing page workspace, click on Attributes user. The cube reads all available attributes for a given model through the API.

Select the attribute you want to collect. Fill in Label and Placeholder. In this example, attribute Email was chosen.

Remember to switch on toggle Required - if it is in the active position, it will be impossible to send data from the landing page if the given input remains empty. A toast notification will be sent and empty fields will be highlighted in red.
The required field for boolean attributes will allow you to send data only when it is TRUE, which can be useful while collecting marketing consents.

If your landing page is ready, Save it.
You are back to Landing page information. You need to add Favicon, Tile, and Description to your page. On the right side, there is a preview of your Home page & Thanks Page. Click Next.

Now, you can either save your page as a draft or publish it.

A/B tests
To add another version of the landing page for A / B tests, you can do it in two different ways:
1. Copy a page for A / B testing - redirects to the Editing page, where you can create another version of your landing page.
2. Use template - redirects to Landing page templates, where you can choose another template.

After creating another page version, on Landing Page Information, you can switch between both pages to see their settings. When finished, click Next.

A/B tests parameters
Now, you are on the A/B Tests page, where the proper parameter for your test must be chosen.

Manually- the user decides which versions are displayed and can freely change the displayed versions
Run automatically after a specific number of visits - the system will select itself the version with the best conversion after the total number of visits on all landing page versions.
Run automatically after a specific number of conversions -the system will select itself the version with the best conversion after the total number of conversions from all landing page versions.
Run automatically after a specific number of days - the system will automatically select the version with the best conversion rate after a certain number of days.
You can enter below manually the numbers that suit your needs best:

When the system selects the best version, it will not display the other versions of the landing page.
Summarize
Choose Tools -> Landing pages to see the list of all your pages.

Select the Name of a page, you want to see details of. You are directed to Summary for: Test page:
URL - add the URL of your landing page here:

On the left side, there is a menu:
Summary - you can add page URL here, see the Key statistics and the Total number of visits

A/B tests - you can compare A/B tests statistics here easily:

Visitors - you can track your visitors via tags and lists:

Leads - you can track your leads via tags and lists:

Settings - in display options decide to either display landing page with or without chat widget:

Additionally, you can add your own JS code here.

The summary shows information about the landing page, A/B test parameters, and views of all creations. This is the last step before publishing your landing page.
Adding your own domain
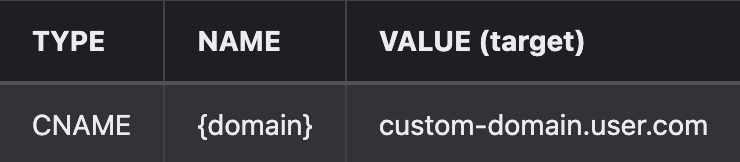
You need to add a CNAME record.
On the provider's site (eg. Cloudflare, Freenome, etc.), you need to add a CNAME record pointing to your custom-domain.user.com app. An example record looks like the screenshot below:
Thanks to this action, your domain is connected to the user.com application.
Example:
For a landing page that is to be on the subdomain **, called specials.example.pl, you will add a record with your provider:
Name - your subdomain, so here: "specials"
Value - it is literally "custom-domain.user.com" - you don't need to replace anything there
Then, to set a specific address, you need to do it in the landing page view.
** Note: We can add one subdomain per landing.
Landing Pages in automations
Visits and conversions on a given landing page can be used for automation.
For each entry to the landing page, the entry in the user's profile with a unique landing page ID is displayed. Also, when entering the thankspage on the user's timeline, the entry is rendered.
Additionally, for each click on submit, the event is fired, which includes the landing page id, versions (if there are a / b tests), and all parameters collected from the inputs on the landing page.
Based on that, you can start some automations with the Event trigger module.
Detailed instruction can be found here.